Contents

Tonegrid Manual

Tonegrid 1.1.62
01

Start playing

Choose your input, calibrate, and load a sound.

Audio setup

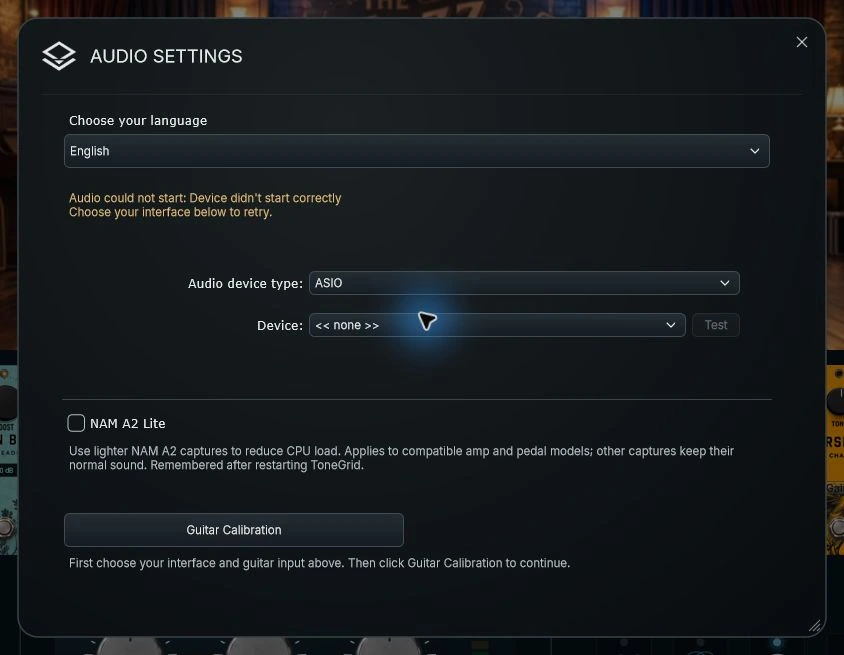
  1. Open Settings → Audio Settings. Choose your interface, guitar input, and headphone or speaker output.
  2. Turn off the interface’s direct monitoring to hear only the processed guitar.
  3. Start with a 128-sample buffer. Increase it if you hear crackles; reduce it for less delay.

Windows: prefer the interface manufacturer’s ASIO driver. In a DAW, choose the audio device and buffer in the host.

Audio Settings: interface selection and NAM A2 Lite
01Select a connected interface. This example shows a device that is unavailable.

Guitar calibration

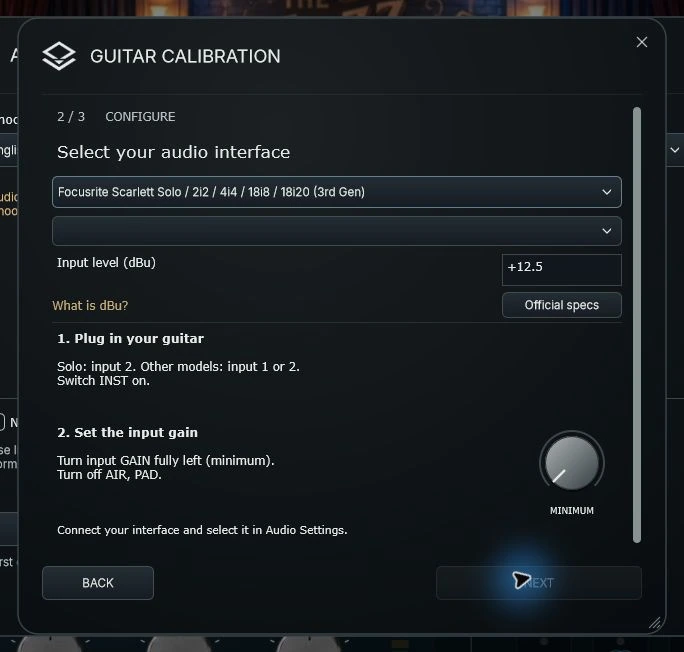
  1. Open Settings → Guitar Calibration and choose your interface profile.
  2. Follow its input, gain, and switch instructions. For an unlisted interface, enter its input reference in dBu.
  3. Play a few notes, check for clipping, and save.
Guitar Calibration: profile and input gain instructions
02Keep the physical input gain at the setting specified by your profile.

Then load a preset. Use AMP Gain for drive and Volume for listening level. Try NAM A2 Lite in Audio Settings if a compatible model uses too much CPU.

02

PLAY · Pedals

Build your board, then adjust the sound.

Overview

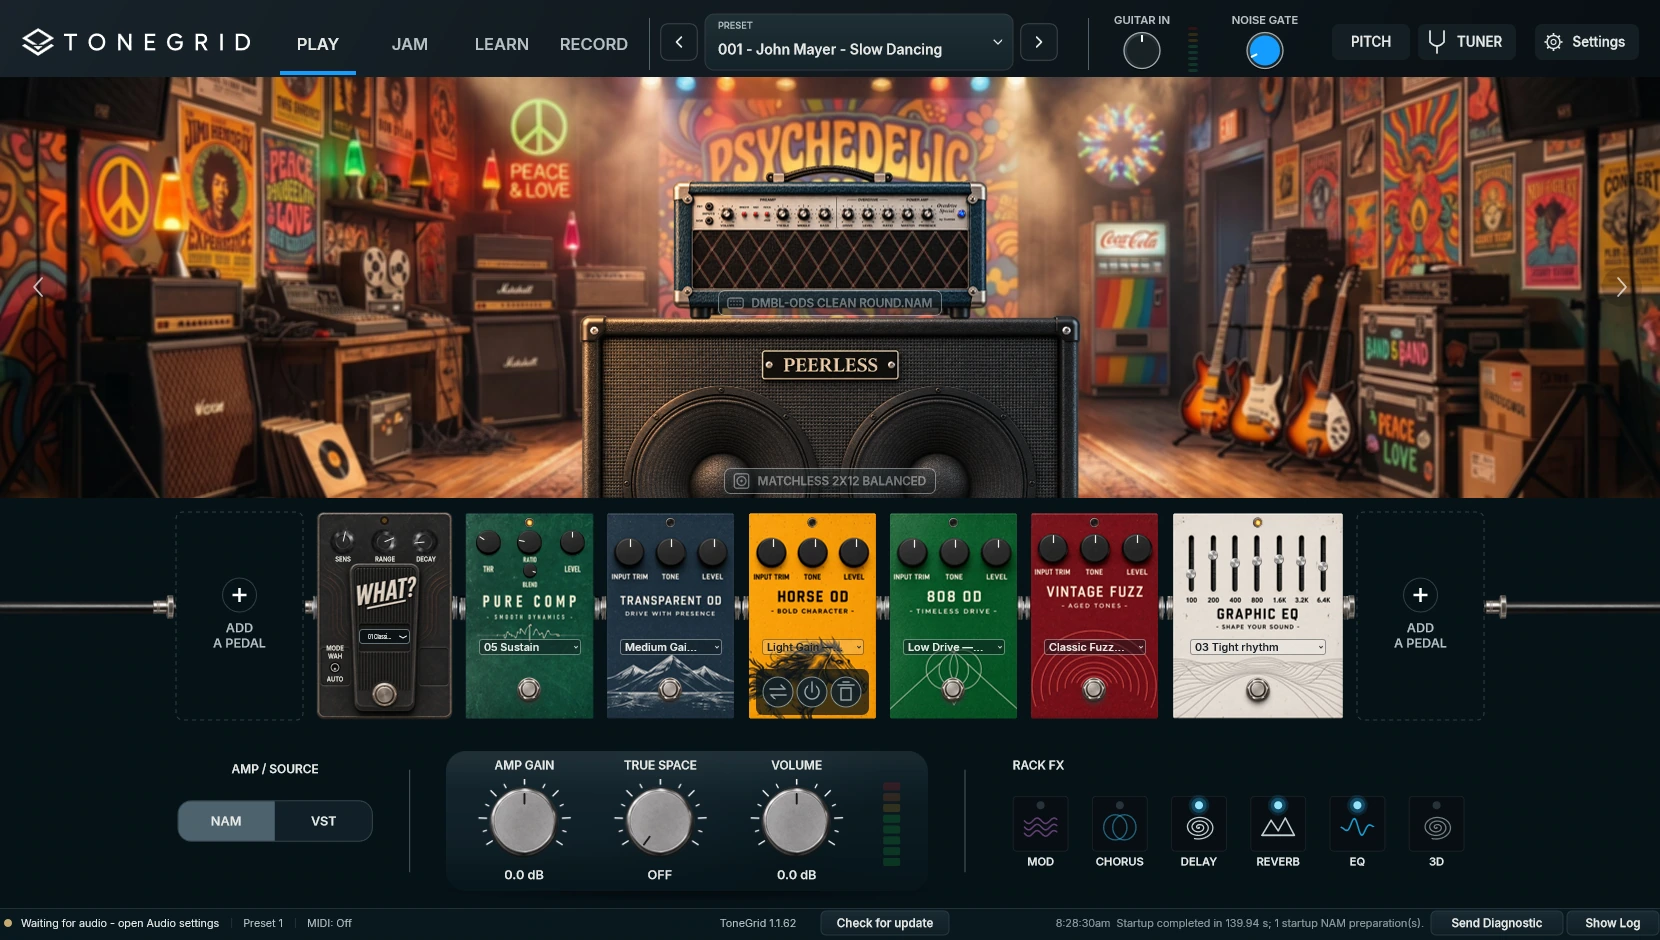
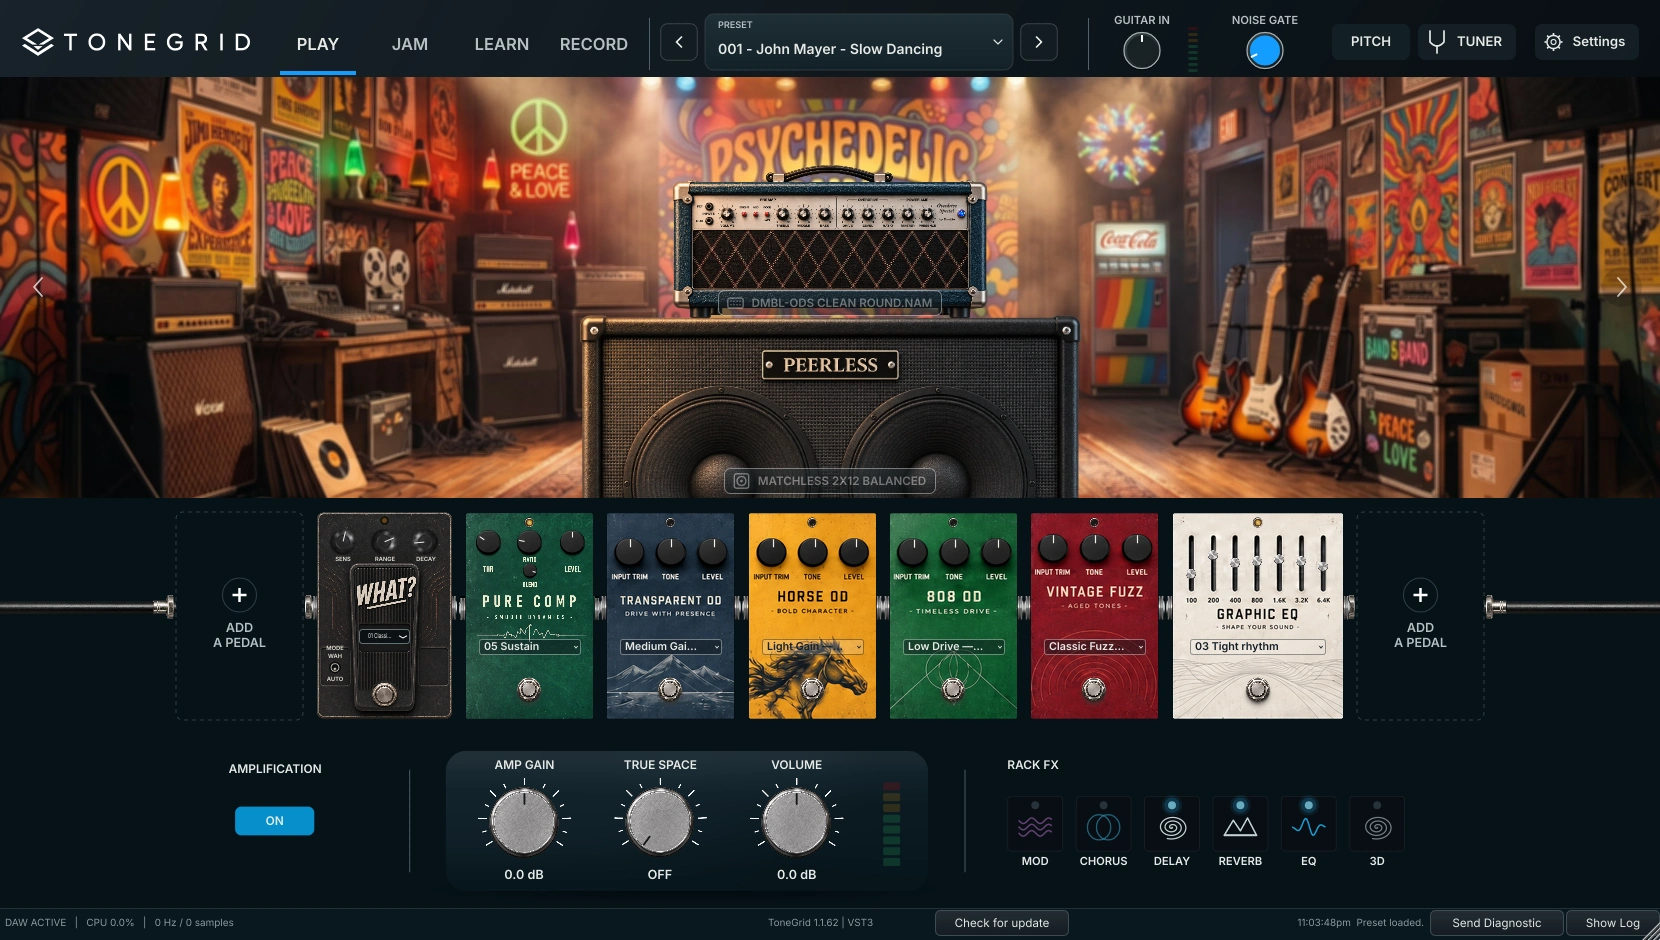
  • Click a pedal’s body to enlarge it; click its footswitch to switch it on or off.
  • Hold and drag a pedal or its move handle to change the order.
  • Hover for power and remove actions. Choose a capture from the pedal’s selector.
  • Save your preset to keep the layout and settings.
Pedalboard hover actions
03Nine positions. Each built-in pedal type can appear once.

Add

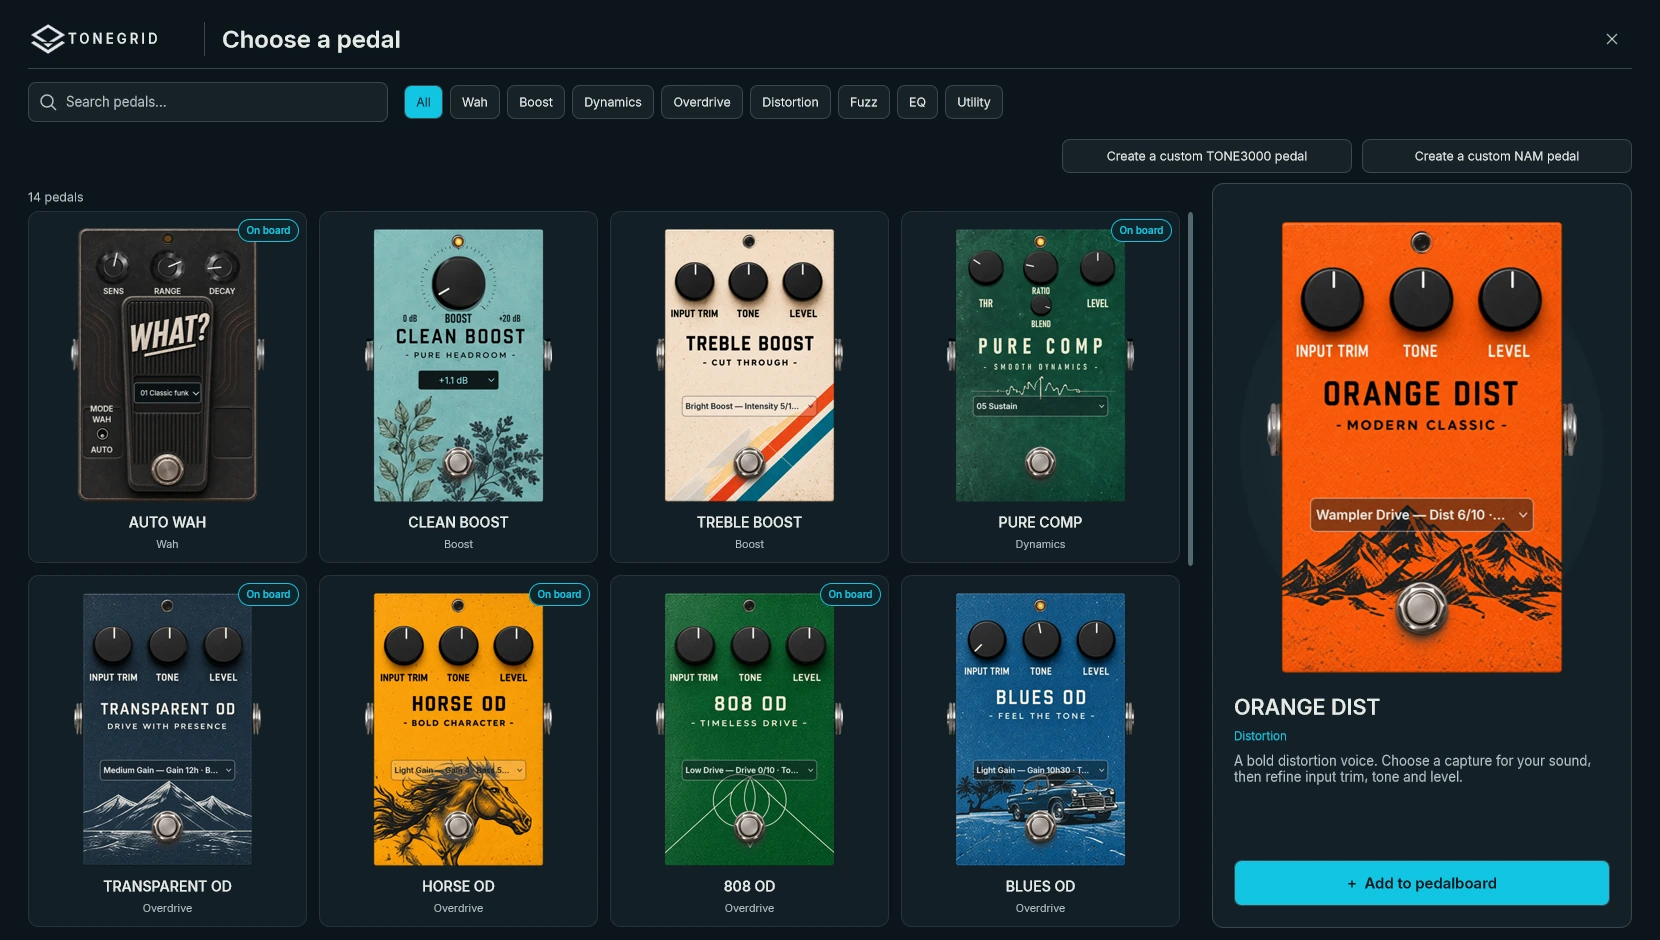
  1. Click Add a pedal in an empty position.
  2. Search or filter the catalogue, then select a pedal.
  3. Click Add to pedalboard.
Pedal catalogue with search, filters and Add to pedalboard
04Choose a pedal, read its short description, and add it.

Add a NAM

  1. Open Add a pedal → Create a custom NAM pedal.
  2. Choose your .nam file or files and name the pedal.
  3. Select a capture. Adjust Input Trim, Tone, and Level.
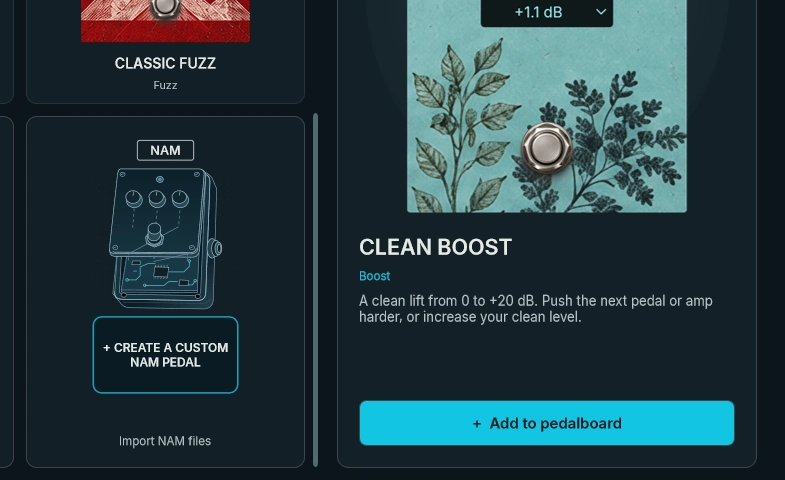
Custom NAM pedal tile with its create action and adjacent pedal preview
05Choose this action for NAM files on your computer.

Add Tone3000

  1. Open Add a pedal → Create a custom TONE3000 pedal.
  2. Sign in if requested, choose a pedal pack, and import it.
  3. Name the pedal and select a capture from the pack.
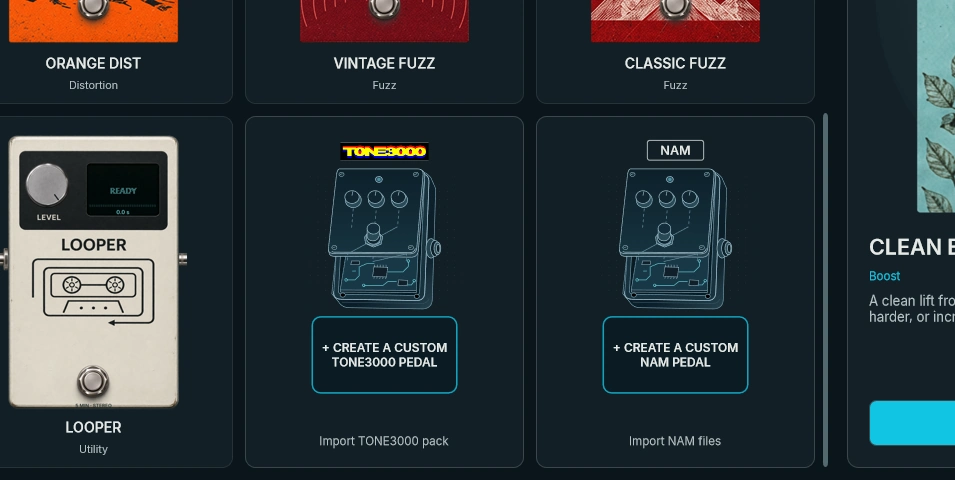
Custom TONE3000 pedal tile with its create action among the available pedals
06Choose this action for a TONE3000 pedal pack.

Presets with custom pedals stay local. Keep your capture files when backing up.

03

PLAY · Amps / IR

Choose an amp, pair a cabinet, or import your own.

Overview

Choose NAM in the footer. Click the amp or cabinet on the stage to browse.

  • Head Only: use a separate cabinet IR.
  • Full Rig / amp-and-cab: the cabinet is already captured; Tonegrid bypasses the extra IR.
  • Lock this cabinet: keep the same IR while changing heads.
  • Normalize: balances listening levels after the amp. It does not change amp drive.

Our Catalog

  1. Open the amp browser and choose a category or search for a model.
  2. Select a capture and confirm. For a head, open the cabinet browser and choose an IR.
  3. Adjust AMP Gain for saturation and Volume to balance the sound.
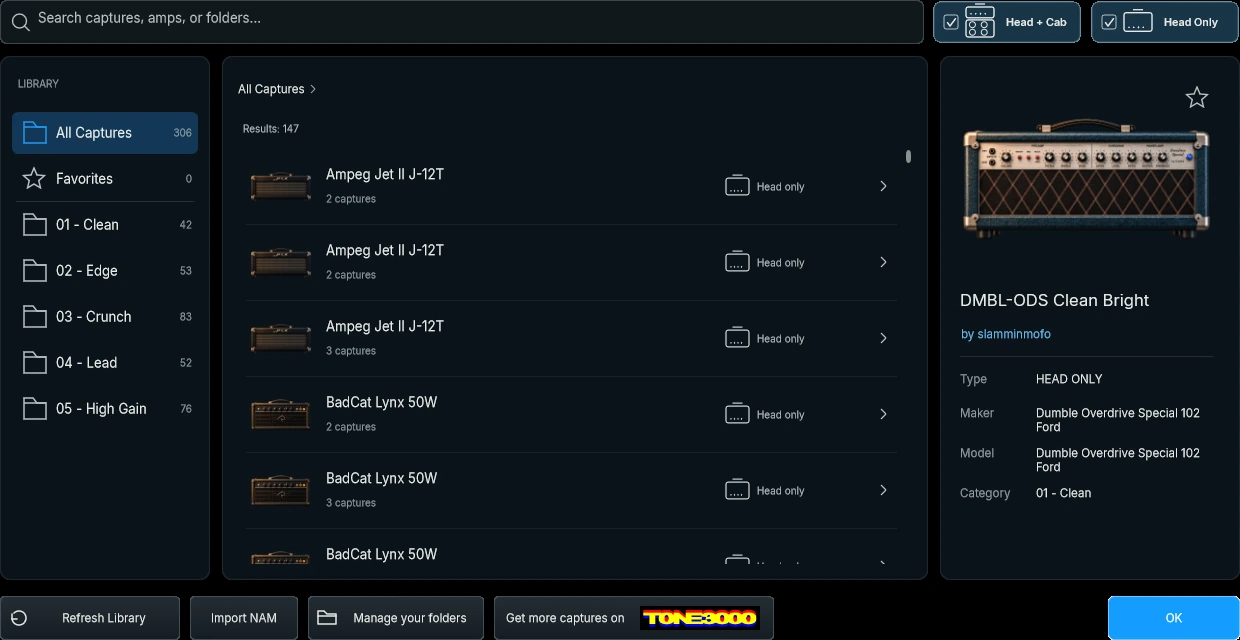
Factory amp browser with categories and capture information
07Browse amp families, then choose an individual capture.
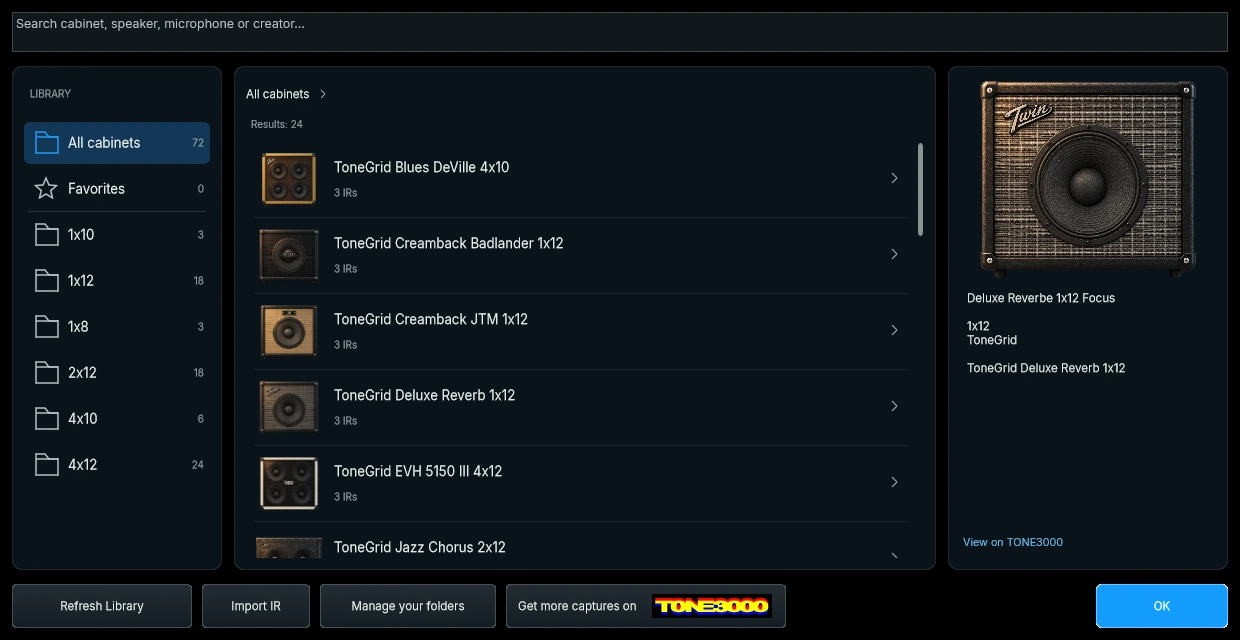
Factory cabinet IR browser
08Choose a cabinet separately when using a head capture.

Add a NAM

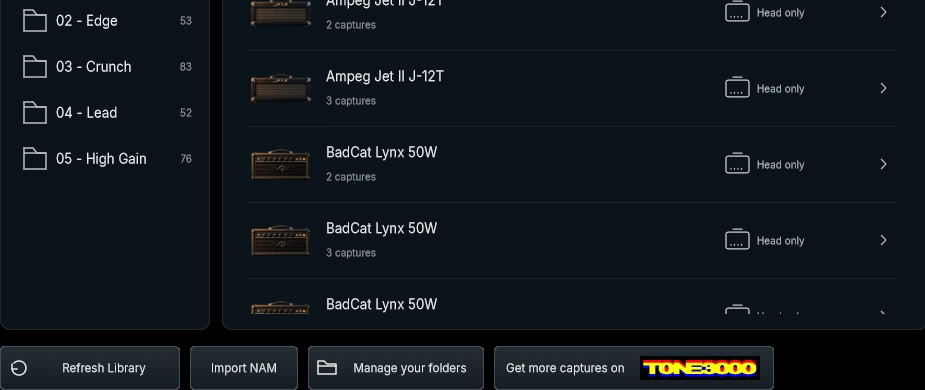
  1. Open the amp browser and click Import NAM.
  2. Choose your .nam file, wait for the library to refresh, and select it.
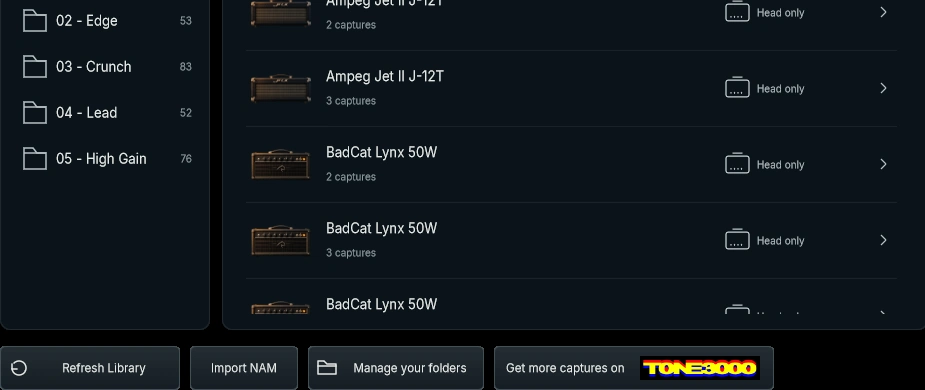
Amp capture list and footer containing Refresh Library, Import NAM and TONE3000
09Import NAM · amp browser

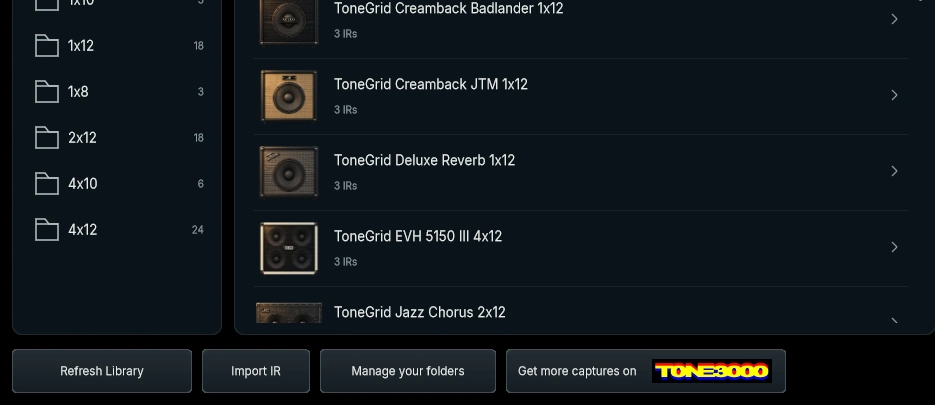
To add a cabinet, use Import IR in the cabinet browser and choose its WAV file.

Cabinet list and footer containing Refresh Library, Import IR and TONE3000
10Import IR · cabinet browser

Add Tone3000

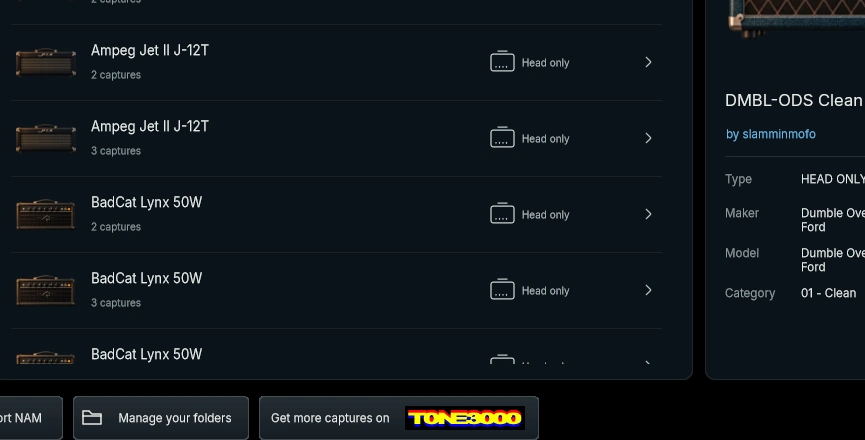
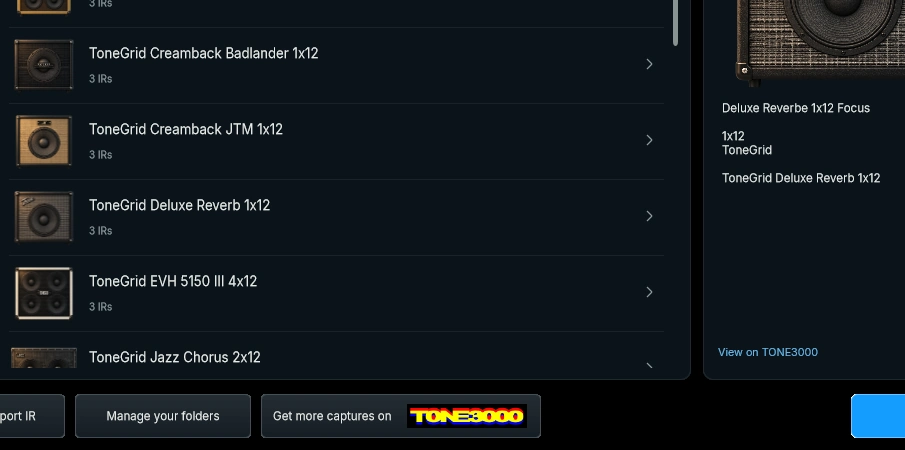
  1. Open the amp or cabinet browser and choose TONE3000.
  2. Sign in if requested and choose the amp capture or cabinet IR.
  3. Import it, then select it in the library.
Lower amp browser with capture list and the Get more captures on TONE3000 action
11TONE3000 · amp browser
Lower cabinet browser with IR list and the TONE3000 action
12TONE3000 · cabinet browser

Use Refresh Library if new files do not appear.

Amp library list and footer with Refresh Library at the lower left
13Refresh the library after importing files.
04

PLAY · Rack FX

Click an icon to edit. Right-click it to switch the effect on or off.

MOD

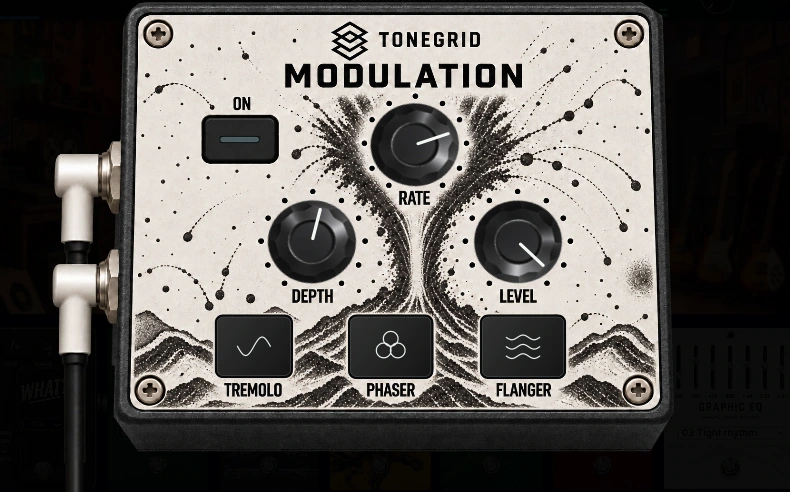
Choose Tremolo, Phaser, or Flanger. Set Rate for speed, Depth for movement, and Level for output.

MOD editor with Tremolo, Phaser and Flanger modes
14Click MOD in the Rack FX footer to open this editor.

Chorus

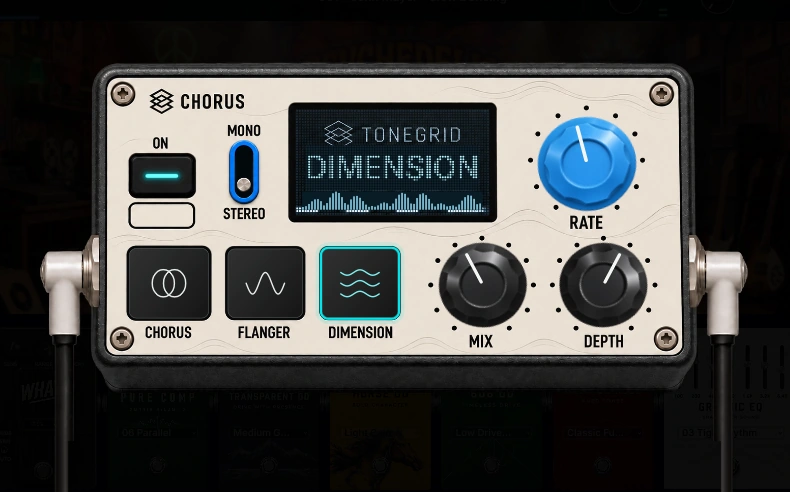
Choose Chorus, Flanger, or Dimension, then balance Mix. Use Rate and Depth to shape the movement; select Mono or Stereo for your outputs.

Chorus editor with mode, rate, depth and mix controls
15Click Chorus in the Rack FX footer.

Delay

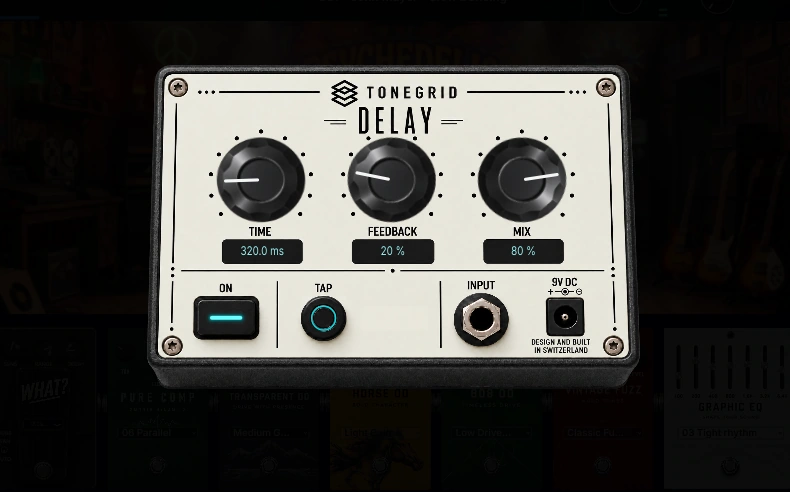
Set Time between repeats, Feedback for their length, and Mix for their level. Tap Tap in time to set the delay interval.

Delay editor with Time, Feedback, Mix and Tap
16Start with a low Mix and Feedback.

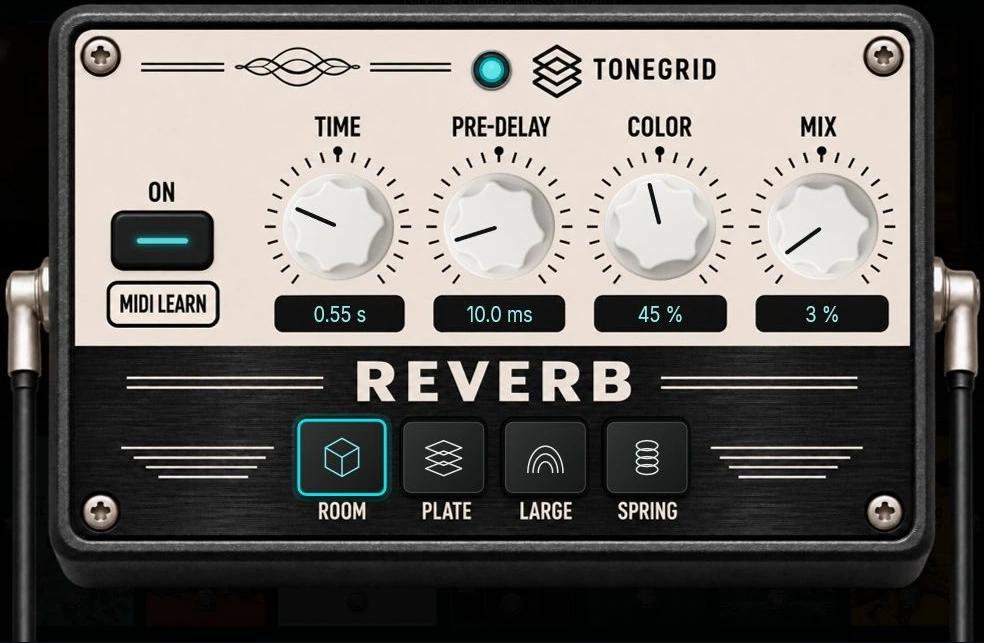
Reverb

Choose Room, Plate, Large, or Spring. Set Time for the tail, Pre-delay for the gap before it, Color for tone, and Mix for level.

Reverb editor with four controls and room modes
17Close an editor with Escape or its close button.

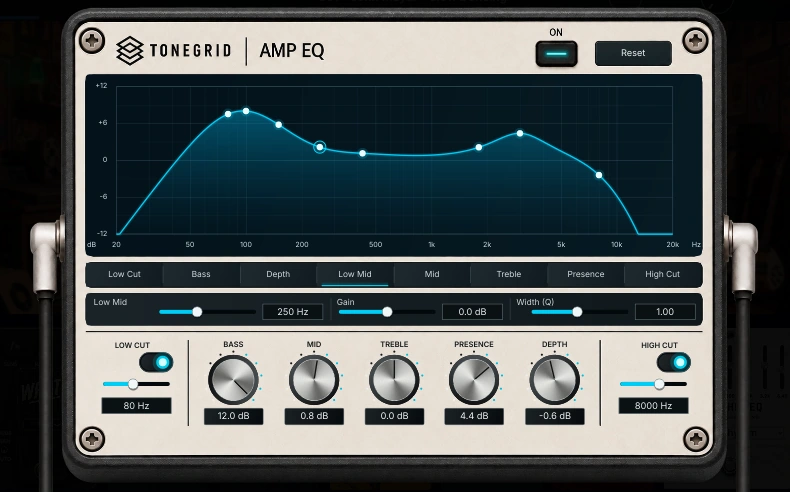
EQ

Shape the finished amp sound with the graph, tone controls, and low/high cuts. Graphic EQ on the board shapes the signal before the amp.

Rack EQ graph and tone controls
18Compare settings at similar listening levels.

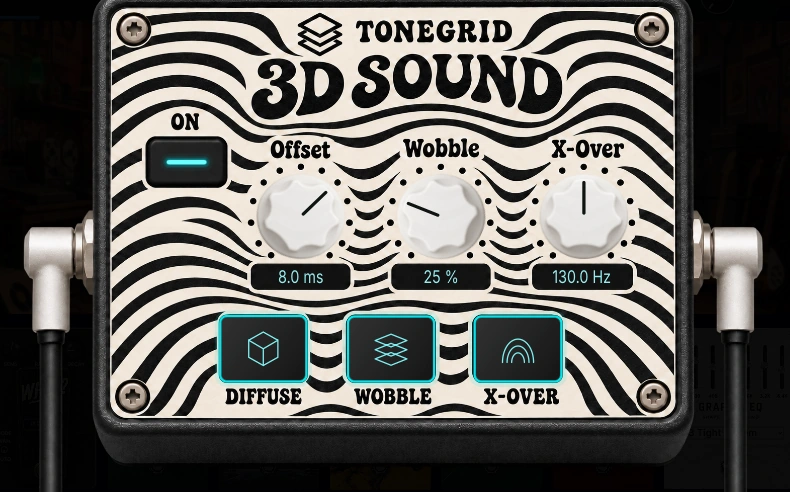
3D and True Space

Use 3D for stereo width and movement. Raise True Space in the footer for room ambience; zero is OFF. Lower Volume if combined effect returns make the output clip.

3D Sound controls
19Check stereo effects through your actual speaker or headphone setup.
05

Presets · Your Presets

Keep and organize your own sounds.

Load and save

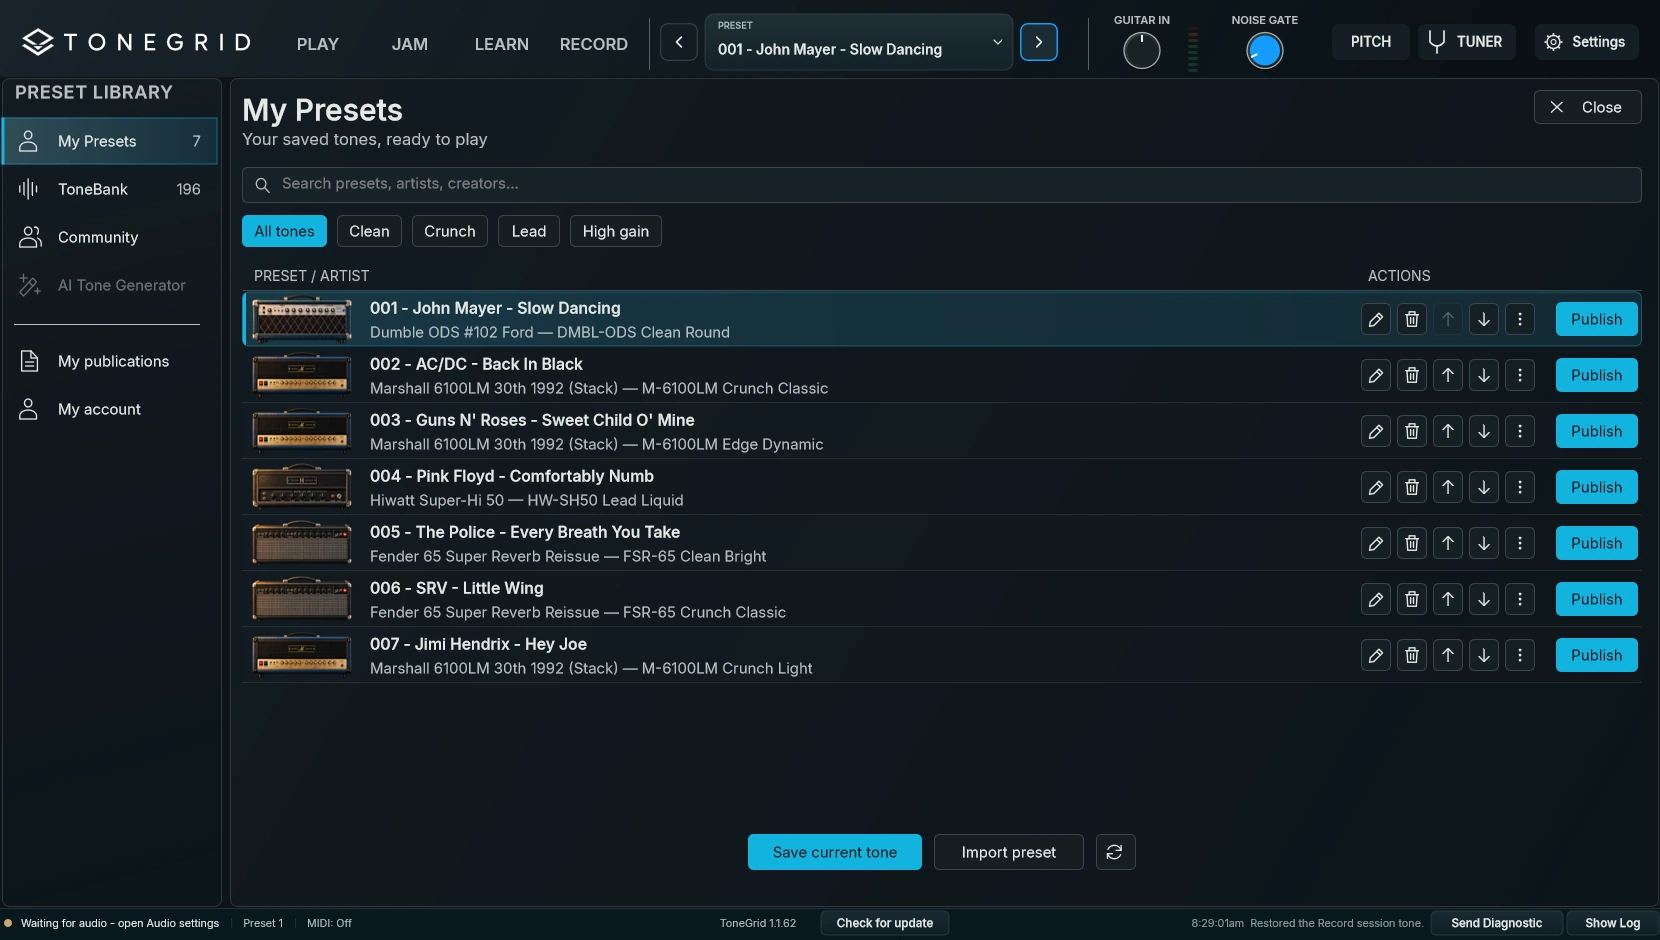
  1. Click the header’s Preset selector and open My Presets.
  2. Load a sound. After editing, choose Save → Replace current or Save as new.
My Presets library with saved sounds and row actions
20Your Presets in this guide corresponds to My Presets in the app.

Use row actions to rename, reorder, or remove a sound. The header arrows step through presets.

Import and export

Use Import to open a .tgpreset file, or a row’s export action to share one. Keep the matching NAM and IR files too: the preset document does not back up your capture library.

06

Presets · ToneBank

Official sounds inspired by songs and artists.

Find your song

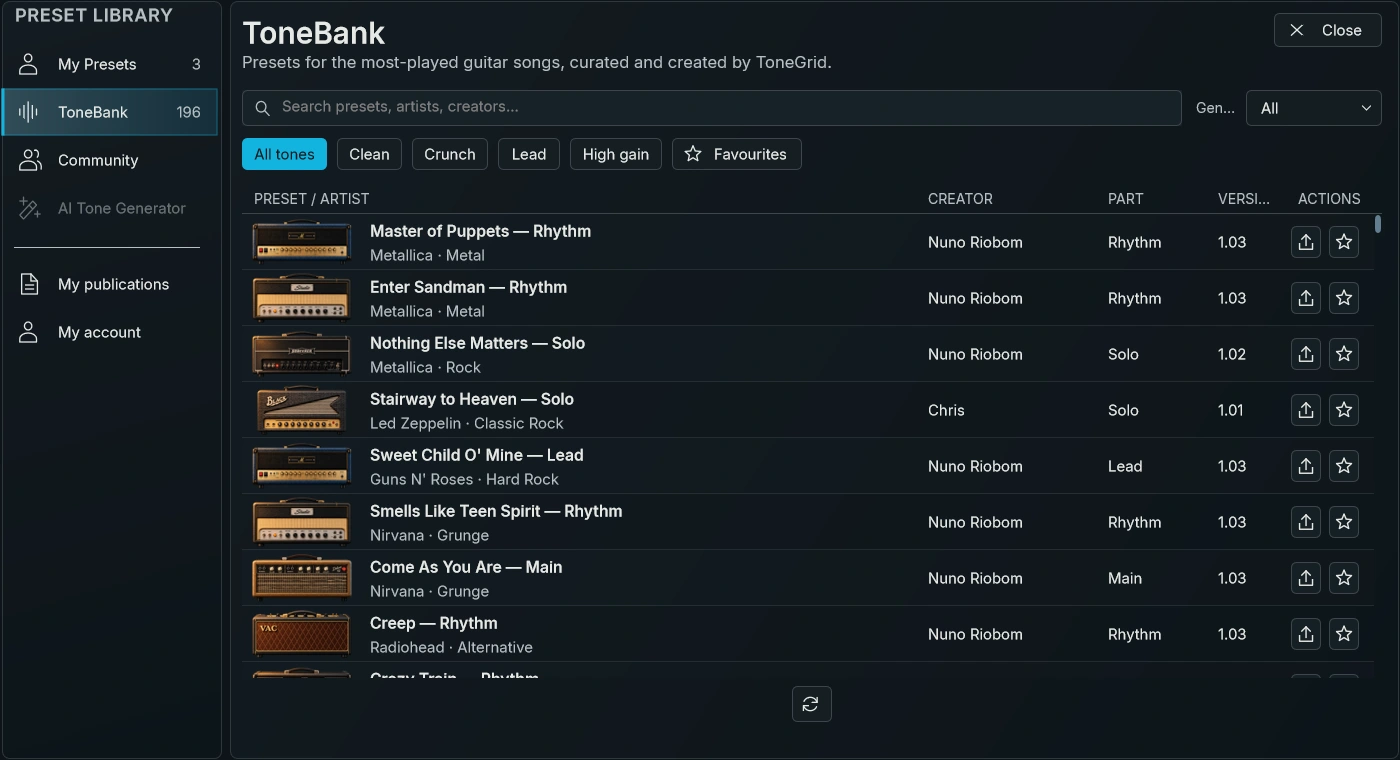
  1. Open Preset → ToneBank and search for an artist or song.
  2. Choose the part you need: Rhythm, Intro, Clean, Lead, or Solo.
  3. Load it, adjust for your guitar, and save your version in My Presets.
ToneBank with song, artist, part and favourite actions
21Use the star for favourites and Refresh to check for bank updates.
07

Presets · Community Cloud

Discover and share sounds with other players.

Overview

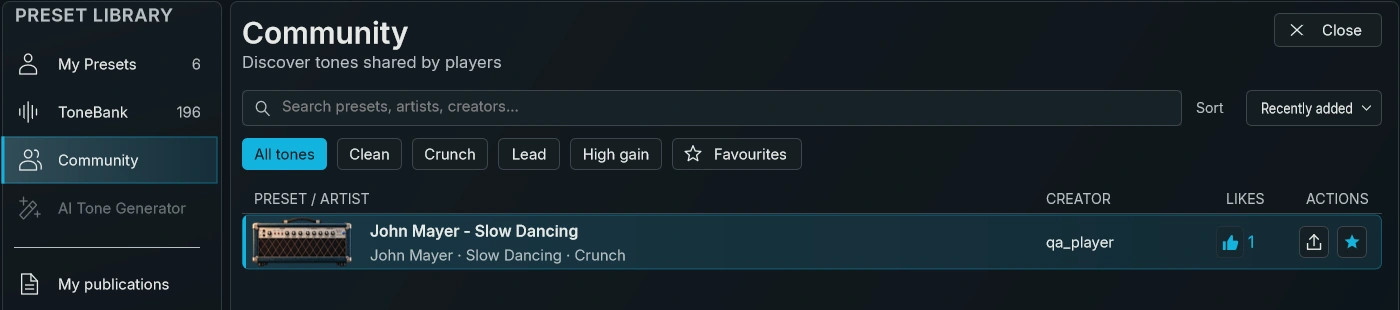
Open Preset → Community. Search, filter, and load a sound. Save a personal copy to edit it.

Community preset browser
22Community Cloud in this guide corresponds to Community in the app.

Publish

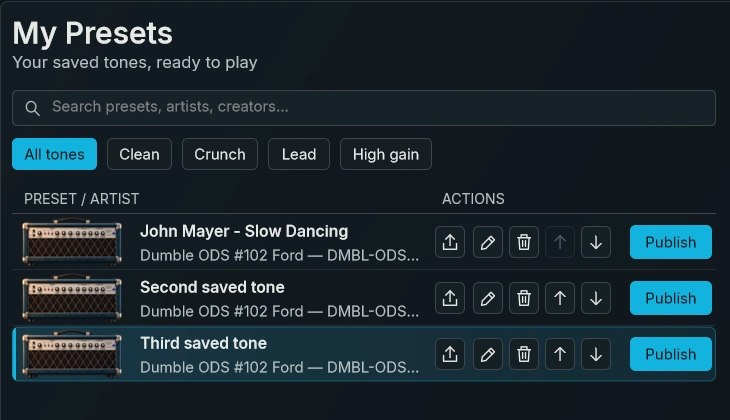
  1. Save your sound in My Presets, then click its Publish button.
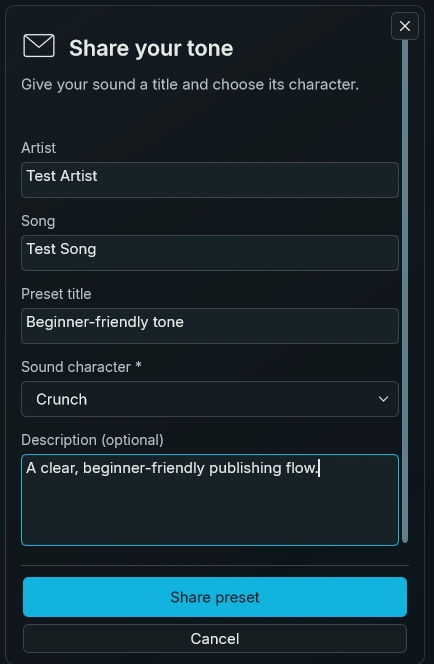
  2. Sign in if requested. Enter the artist, song, preset title, and sound character.
  3. Review the details and click Share preset.
My Presets list showing Publish beside each saved preset
23Start from the Publish button beside your saved preset.
Share your tone form and Share preset button
24Choose a sound character before sharing.

Community accepts supported Factory and TONE3000 captures. Custom-pedal presets stay local.

Your account

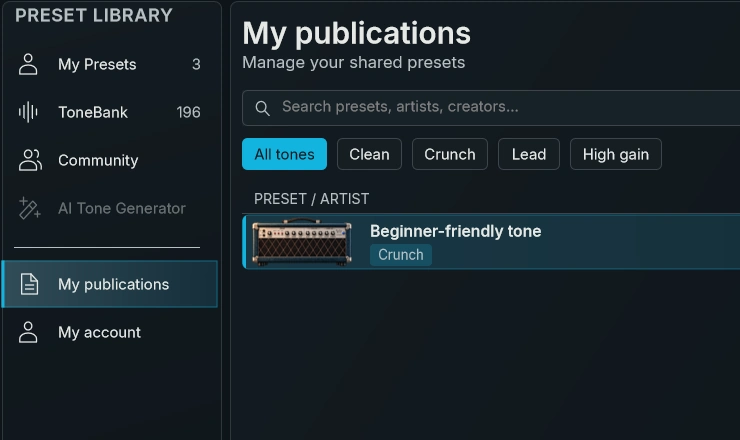
  1. Open the preset library and choose My account.
  2. Enter your email and the 8-digit code sent to your inbox. Choose a Community name if this is your first sign-in.
  3. Use View my publications to manage your shared sounds, or Sign out to leave the account.
Preset library navigation with My publications and My account
25Open My account from the library sidebar.

Your email stays private. Delete my account permanently removes the account, publications, and likes; locally saved presets remain.

Delete a preset

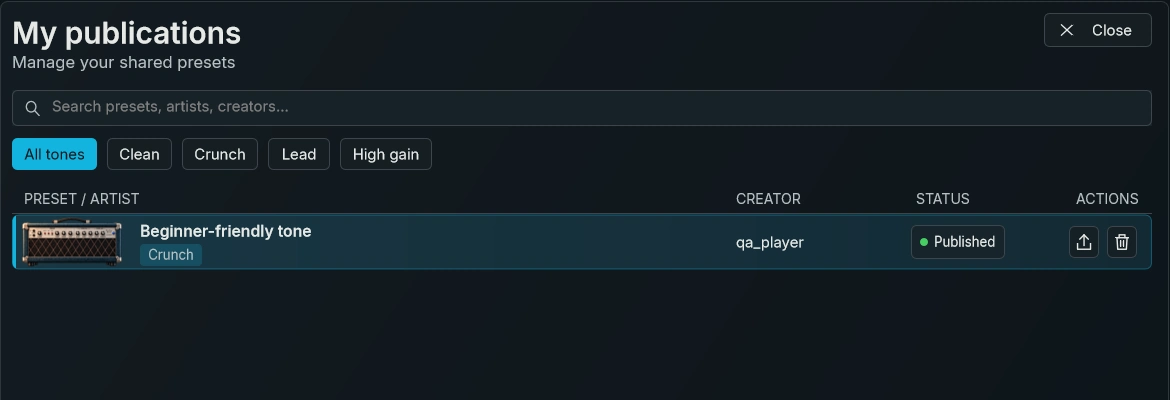
  1. Open My publications and find your shared preset.
  2. Click its trash action.
  3. Confirm Withdraw preset to remove it from Community.
My publications heading and a published preset row with its trash action
26The trash button removes your own Community publication.

Your local preset stays in My Presets. Delete that copy separately only if you no longer want it.

Missing captures

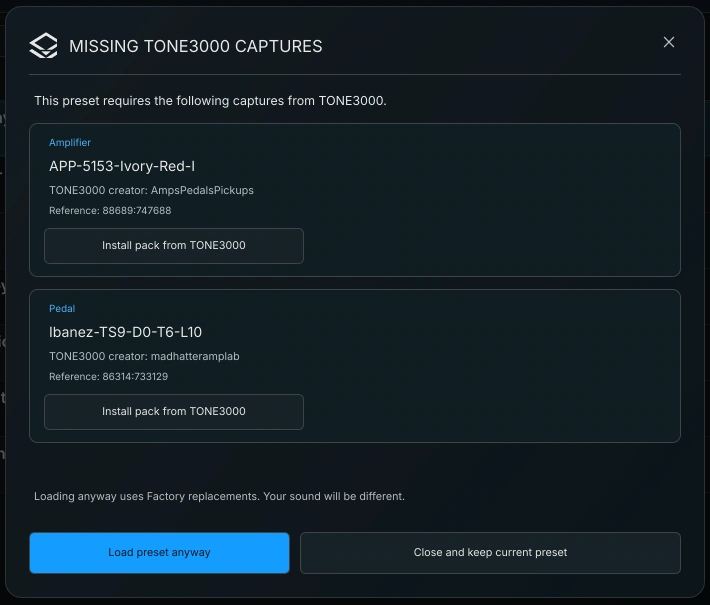
Use Install pack from TONE3000 for each missing source. If the exact file is unavailable, keep the current preset or explicitly accept the offered replacements. Replacements change the sound.
Missing capture cards with install and replacement options
27Install the requested files to recover the original tone.
08

Tuner

Tune one string at a time.

Tune your guitar

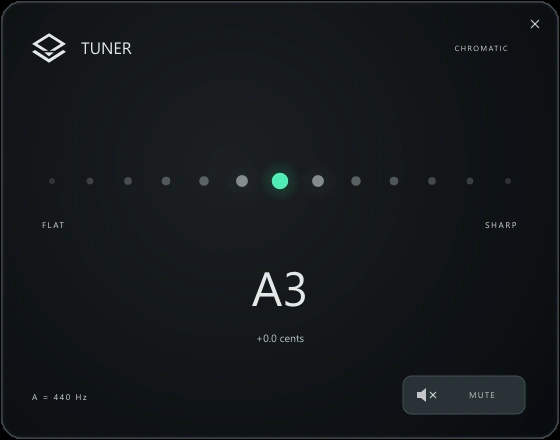
Click Tuner in the header. Play an open string, let the note settle, and adjust until the pitch indicator is centred. Close the tuner to return to playing.

Chromatic tuner showing a centred A3
28No note detected? Check the guitar input and meter.
09

Pitch

Transpose your guitar or add octave voices before the pedals.

Transpose and Octaver

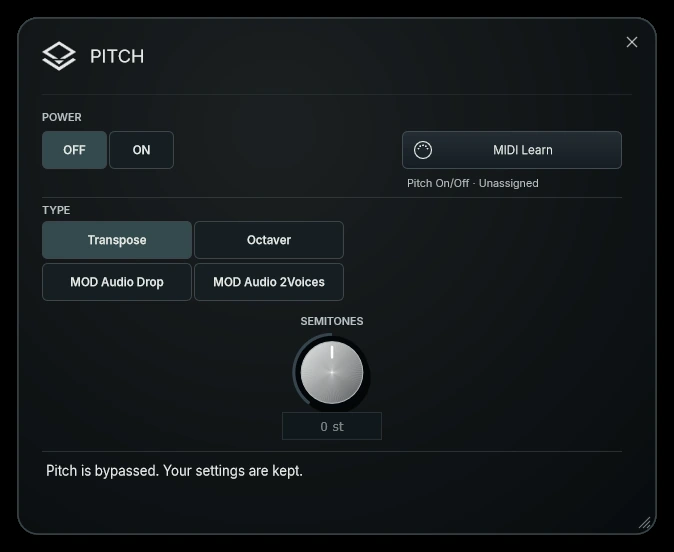
Open Pitch, choose Transpose, set the semitone amount, and switch it ON. Choose Octaver to blend the dry signal with lower and upper octave voices.

Pitch power, mode and semitone controls
29Bypassing Pitch keeps your values.

If shown, MOD Audio comparison modes are live-only. Presets and offline rendering use the Tonegrid engine.

10

MIDI

Learn from a pedal directly, or use the central assignment list.

Learn directly on a pedal

  1. Select your controller in Settings → MIDI.
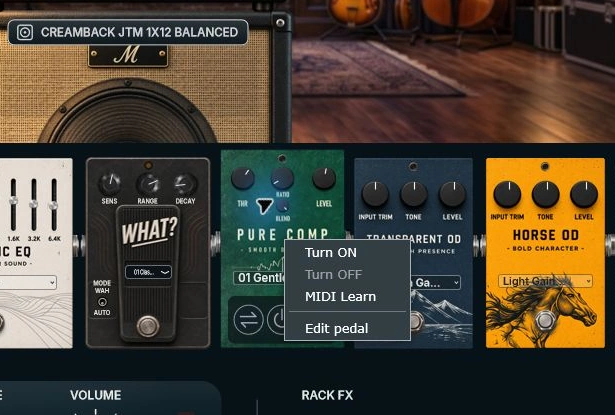
  2. Right-click the pedal → MIDI Learn.
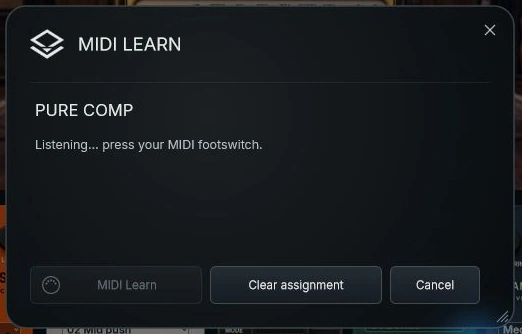
  3. Press the footswitch you want to use. The pedal’s assignment is saved.
  4. Use Clear assignment to remove it, or Cancel to leave learning.
Pedalboard around PURE COMP with its MIDI Learn context menu open
30Right-click the pedal and choose MIDI Learn.
Current MIDI Learn dialog for PURE COMP
31The dialog identifies the pedal receiving the assignment.

Review all assignments

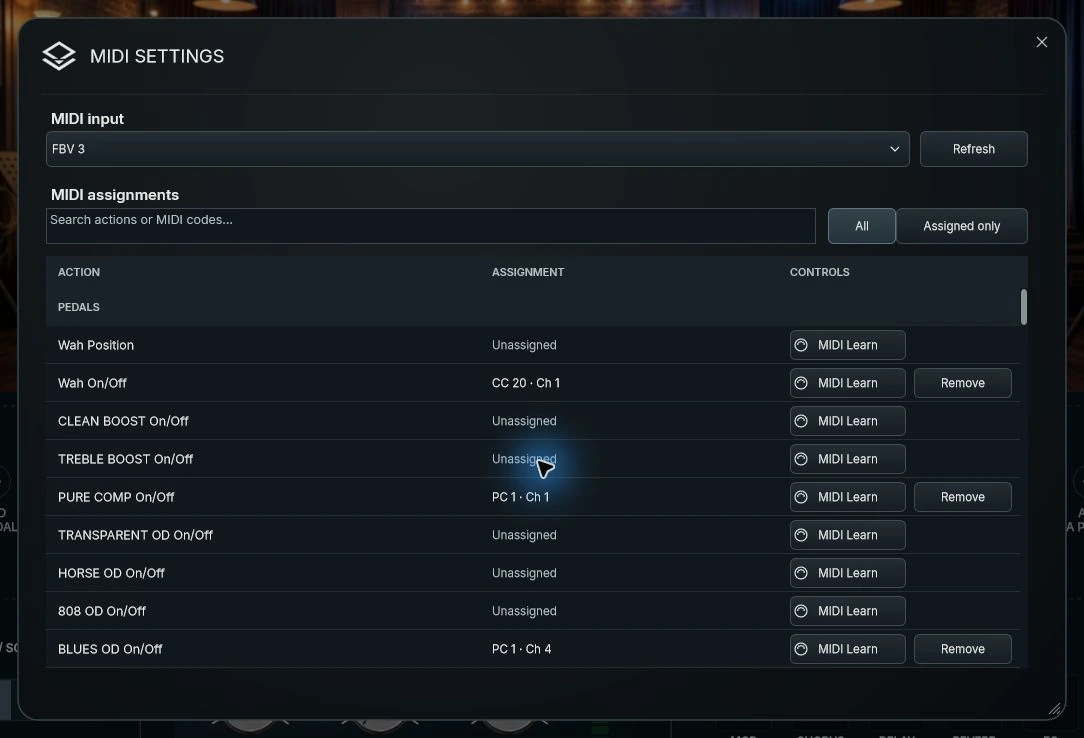
Open Settings → MIDI to search actions, view Assigned only, or learn and remove mappings. Use Refresh after connecting a controller.

Central MIDI assignment list
32Pedal-level learning and this list use the same assignments.

Expression and DAW control

For Real Wah, open its MIDI controls, learn a continuous CC, then calibrate heel and toe. Invert the direction if needed; assign bypass separately.

General MIDI Learn is standalone-only. In VST3, use DAW automation. Real Wah can receive MIDI expression routed by the host.

11

Looper

Record a phrase, add layers, and export it.

Record and overdub

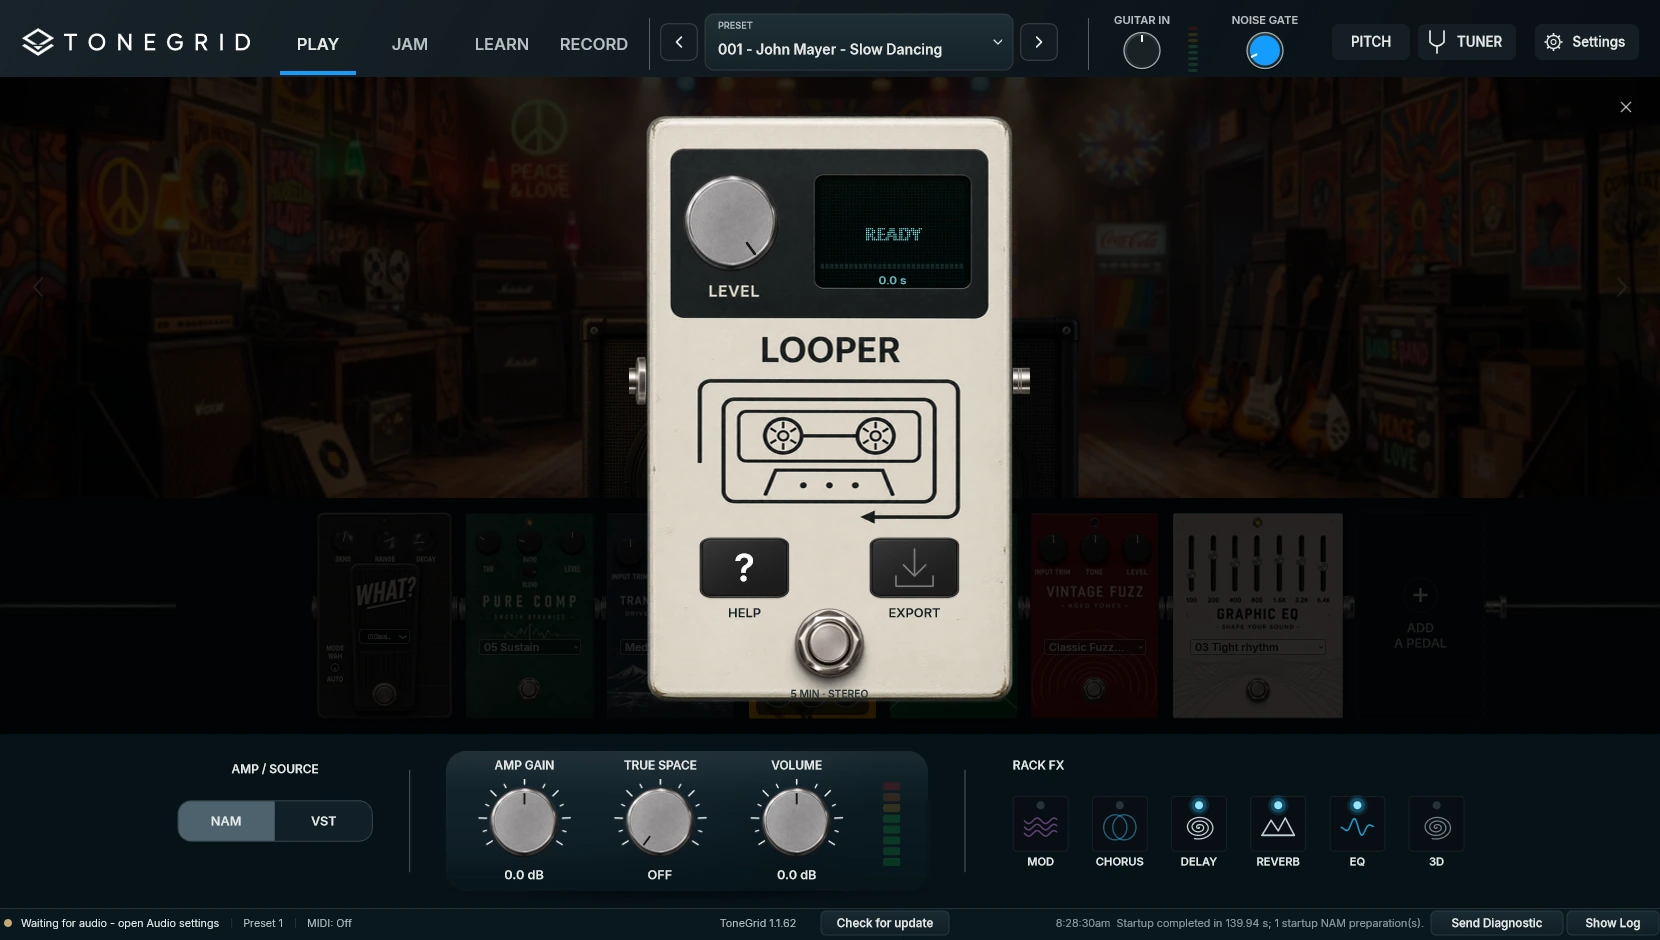
Add Looper from the pedal catalogue. Tap its footswitch to record, tap again to play, then tap to enter or leave overdub. The first take sets the loop length.

Looper pedal with Level, Help, Export and footswitch
33Up to five minutes, stereo. Each layer keeps the tone used while recording.

Stop, undo, and export

  • Double-tap: stop. Tap while stopped: resume from the start.
  • Hold 1.5 seconds while playing: undo the last overdub; hold again to redo.
  • Hold 2 seconds while stopped, then release: clear.
  • Level: playback volume. Export: save the audible loop as a stereo WAV.

Export before closing to keep the loop. To use it in RECORD, load the WAV through Backing Track.

12

JAM

Find a backing track and see the scale on the neck.

Choose and play

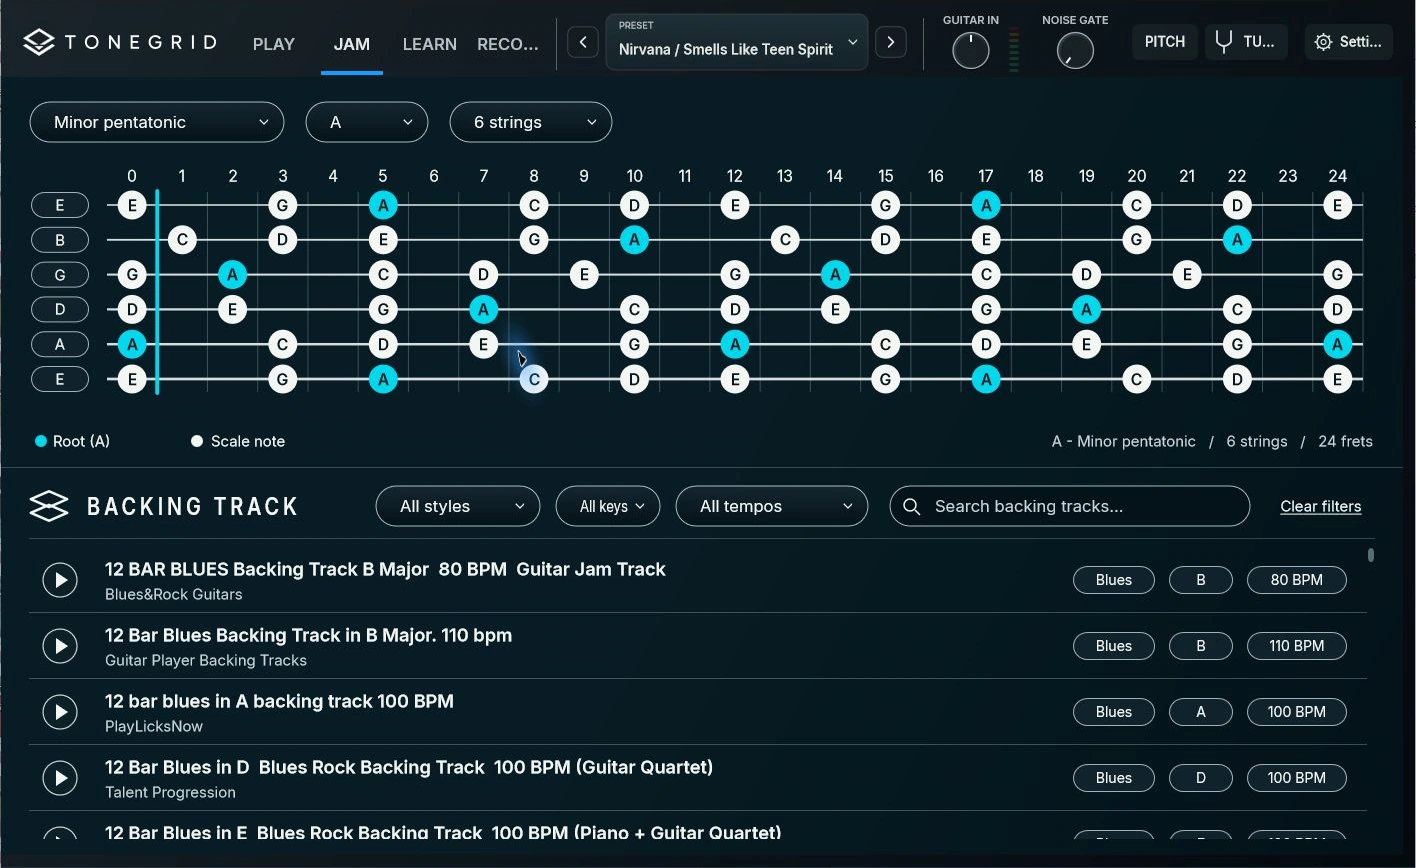
  1. Choose a scale, key, and 6- or 7-string fretboard.
  2. Filter backing tracks by style, key, or tempo; click Play on a track.
  3. Use the player’s volume for the backing and Tonegrid’s Volume for your guitar.
JAM fretboard and backing-track search
34Key and tempo filters find tracks; they do not transpose or time-stretch the video.

Online playback needs internet access. A selected track can update the suggested scale and key.

13

LEARN

Learn a song with Guitar Club.

Find a lesson

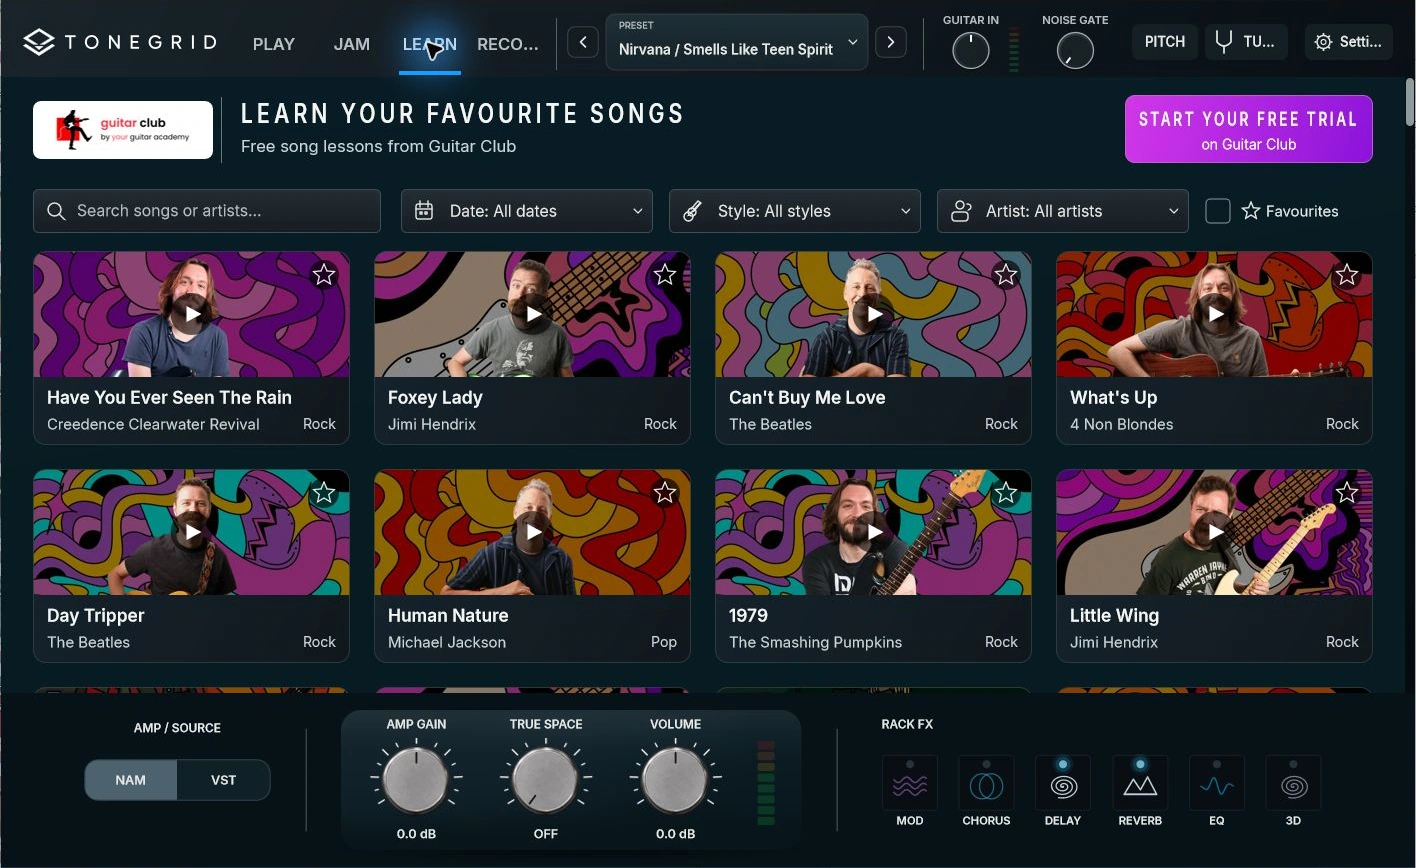
Search by song or artist, open a lesson, and choose its available parts. Pause and replay sections with the video controls. Star lessons to find them again.

Guitar Club lesson catalogue
35Load the matching ToneBank sound from the Preset selector, then return to LEARN.
14

RECORD

Two guitar tracks, backing, and MP3 export in standalone.

Make a take

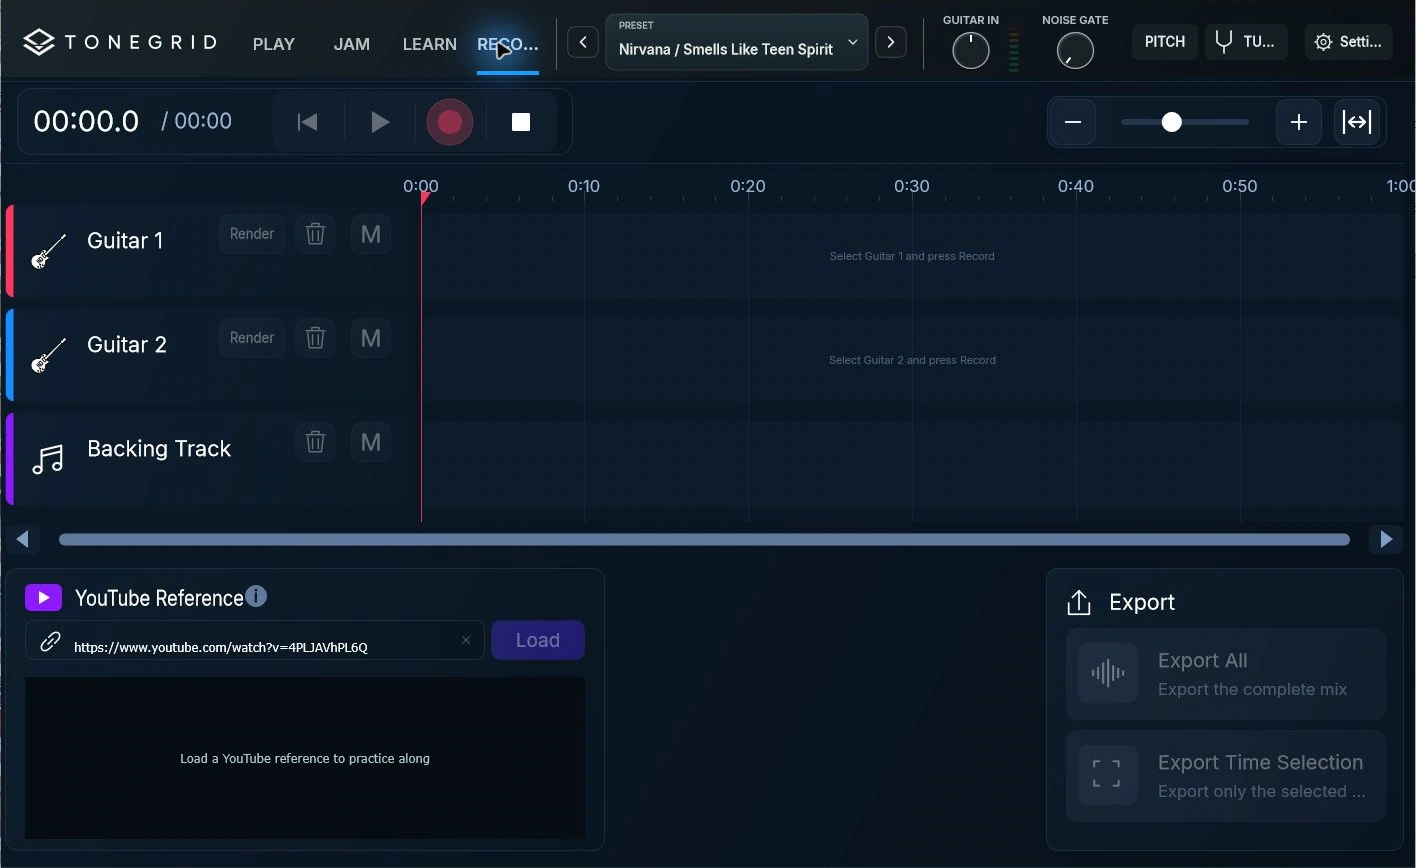
  1. Select Guitar 1, choose a tone, and place the cursor.
  2. Press Record, play, then Stop. Press Play to listen.
  3. Change the tone while the track is editable; the original take is recorded dry.
RECORD with two guitar lanes, backing and export controls
36Space plays or pauses when focus is outside a text field or video.

Add a second guitar

Render Guitar 1 to keep its sound. Select Guitar 2, choose another tone, and record. Use Unfreeze to edit a rendered guitar’s dry take again. Balance the tracks with their levels and M mute buttons.

Edit and add backing

  • Click to place the cursor. Drag the upper ruler to select a range.
  • Drag waveforms to navigate; use − / +, the zoom slider, or Fit song.
  • Delete a selected interval on the editable guitar. Record over an interval to punch in.
  • Click Backing Track to load MP3, WAV, FLAC, or AIFF. It starts at 00:00.

YouTube Reference is for practice. Its timing is approximate and its audio is excluded from exports.

Export and keep your session

Choose Export All, or select a ruler range and choose Export Time Selection. The MP3 mixes audible guitars and local backing using their level and mute settings.

The active session autosaves in Documents/ToneGrid/Recordings/Active. Back up the whole folder to keep dry takes, renders, and backing.

15

DAW and VST3

Two different ways to work with plug-ins.

Tonegrid inside your DAW

Insert Tonegrid VST3 on a guitar audio track, select its input, and enable monitoring. Record, automate, and export in the DAW. The host manages audio devices and buffer size.

Tonegrid VST3 editor with PLAY stage, pedalboard and Rack FX
37Tonegrid’s VST3 editor. Audio routing and recording stay in your DAW.

An external amp inside Tonegrid

In standalone, choose AMP / SOURCE → VST. Scan VST3, add a folder if needed, select a compatible amp, and click Open Amp. Keep using Tonegrid’s pedalboard around it.

Third-party plug-ins are installed separately. Tonegrid VST3 does not host another VST3 inside itself.

16

Troubleshooting

Quick checks for common problems.

Troubleshooting

ProblemCheck
No soundInterface, input/output channels, guitar volume, meters, and track monitoring. Audio must not be OFF.
Dry or doubled soundDisable interface direct monitoring and any second monitoring app.
Crackles or delayAdjust the buffer; try NAM A2 Lite and fewer demanding effects.
Unexpected drive or levelCheck calibration, Guitar IN, pedal Input Trim, AMP Gain, and Volume.
Dull amp toneCheck Head Only versus Full Rig and the external cabinet stage.
MIDI does not respondCheck the selected input, message/channel, and assignment. Refresh after reconnecting.
Video has no audioTry its Play button or a shared audio route. Use local backing for reliable recording timing.

Updates and support

Use Check for update in the status strip. Back up presets, imported captures, custom pedals, and recordings before updating.

For help, send your version, operating system, audio interface, and a screenshot to christian@tonegrid.net. Use Show Log or Send Diagnostic when needed.